the final chapter
While I put some more finishing touches on Ranger last spring and drove him around daily last summer, we went on very few camping trips due to our family moving in opposite directions. We were also having some fun with a stock Jeep Wrangler JKU and were looking toward the possibility of building it up for more serious off-roading and overlanding adventures. The time had come to find a new home for our old friend, hopefully in someone who would love and care for him as we had.
After months of entertaining inquiries from tire kickers and buyers of $3,000 RVs (“Oh, it’s listed for thirty thousand dollars?”), a serious buyer finally landed in my inbox. We talked for a few weeks and I agreed to meet up to entertain a serious inquiry.When Avery and Angela drove their rental car into our driveway on an unseasonably warm and sunny February day, everything just felt right. They were looking for a van that met Ranger’s exact description to drive around the country for a year before settling back into their permanent careers. Young adventurers would certainly do.
We introduced them to Ranger’s features and upgrades, went for a ride, and the deal was done; they would be driving him back to their home in Washington D.C. and would start planning their trip in earnest.
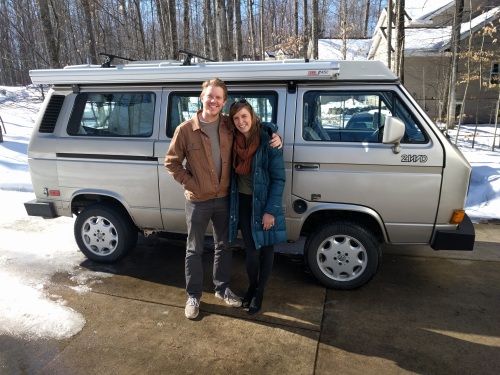
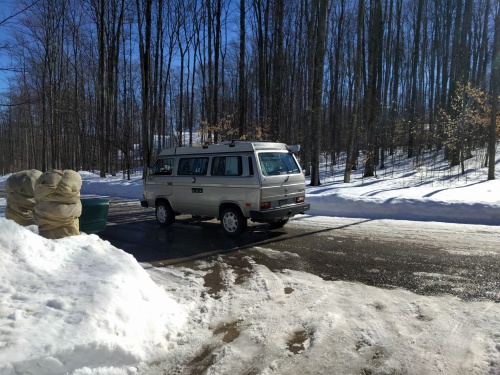
Ranger’s new owners, Avery and Angela!
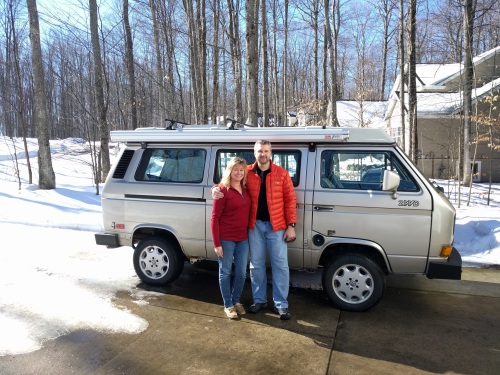
Our final picture with Ranger. Bittersweet.
Going…
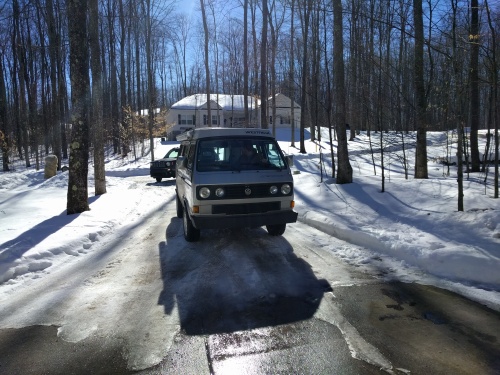
…going…
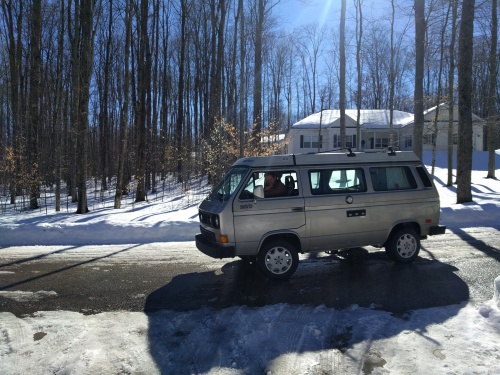
…gone.
In the end, this vehicle touched our lives like no other before it. So many memories were made because of the places it took us. And despite those cold spring evenings with half the insides torn apart (wondering how I’d ever get it back together again) and sitting on the side of the road with all our shit piled up on the shoulder and me doubled over the engine bay trying to fix a new problem, they were always good learning experiences and made for good stories.
So good luck, Avery and Angela, we wish you all the best with your new friend. Oh, the places you’ll go!
Bentley, Kristy, & Taylor
Filed under: Uncategorized | Leave a Comment
rmw airbox
Since my Subaru conversion a few years back I’ve been struggling with a good solution for a replacement airbox; the stock airbox from the donor Forester is big, bulky, and really doesn’t fit in the left side of the engine bay, flopping around loosely or wedged between some things that it shouldn’t be wedged against. While I’ve been thinking about this for a while, experimenting with various airboxes from Toyotas, Volkswagens, and other cars on their last legs at the Ace Vanagon mechanic’s shop, I decided to get serious about solving this problem right after I had to change the air filter last month.
I discovered through the Vanagon Grapevine that our friends at Rocky Mountain Westy developed their own in-house Subaru Conversion Airbox and I was intrigued; it’s a slick piece of kit and though expensive, no other solutions were knocking down my door, so I swallowed hard and ordered one.
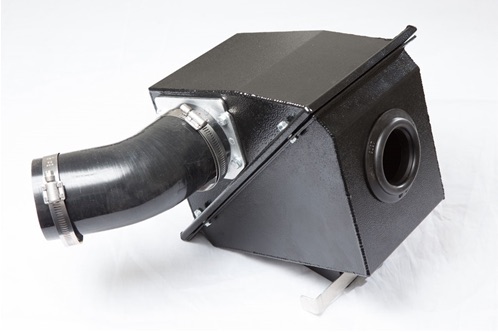
RMW’s Subaru Conversion Airbox
When it arrived I was immediately impressed with the quality of the unit; it’s an aluminum box sporting a black powder coat finish and lots of shiny bits and pieces, all where there supposed to be. Following the instructions (not included in the box, but downloaded from RMW’s website), the box mounts on its own bracket that attaches to the frame and takes its intake air from the cavity below the rear cabinet and in front of the driver’s side tail light. Satisfied with my work, I eagerly took Ranger for a spin.
It became immediately apparent that this box is THUNDEROUSLY LOUD. Under hard acceleration, the rush of intake air through that cavity is amplified to the point where it is uncomfortably loud to passengers in the van (even with my GoWesty 3″ Mattress Topper folded over the rear mattress pad) and rattles the items in the cabinet above it. While performance is excellent with good airflow through the box, the increased noise was unacceptable.
Noodling this new challenge over in my head, I decided to try modifying RMW’s box to take air from outside the van instead of from inside the engine compartment through an amplification chamber. After all, the original VW solution was to bring fresh air into the engine via a snorkel located in the passenger side D pillar. Maybe something similar would work here?
Pursuing this modification required a few extra bits and pieces, foremost being a new snorkel the fit in the driver side D pillar and a method to attach it to the inlet of the RMW airbox. I overcame both of these challenges thanks to my Amazon Prime account by purchasing a 3″ flexible air intake pipe and a 3″ air intake flange. Amazingly enough, these items were not available at my local auto parts stores, so I had to order them online and wait a couple of days for them.
Once the required parts arrived, I got to work on my bench. First, I removed the rubber seal over the intake hole and mounted the 3″ flange.
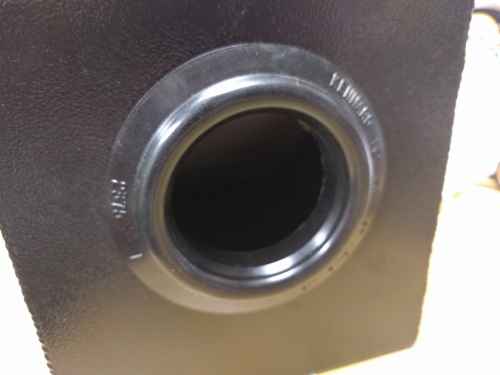
Original RMW inlet; the gasket was removed to mount the 3″ flange.
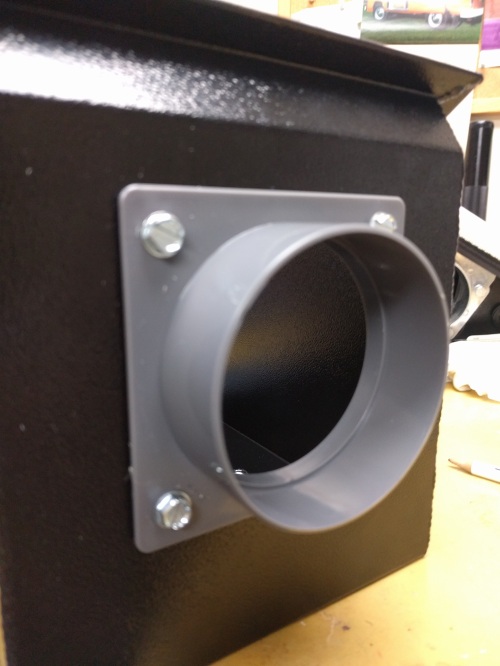
3″ flange on the inlet side of the airbox where my new snorkel will attach.
Since my engine is also equipped with an intake air temperature sensor, I drilled a 3/4″ hole in the side of the RMW airbox to accommodate the sensor probe.
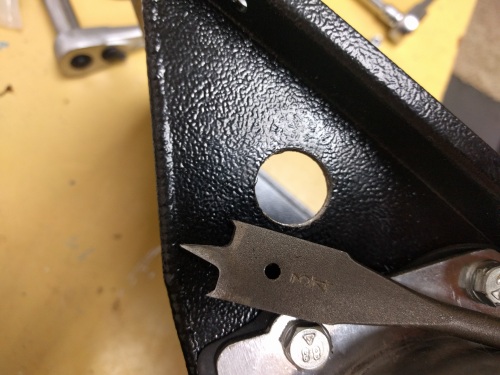
A 3/4″ spade bit was the perfect size to mount the air temperature sensor.
Air temperature sensor probe mounted.
Once these simple modifications were complete, I snapped this photo of the new RMW airbox and the awkward Subaru airbox.
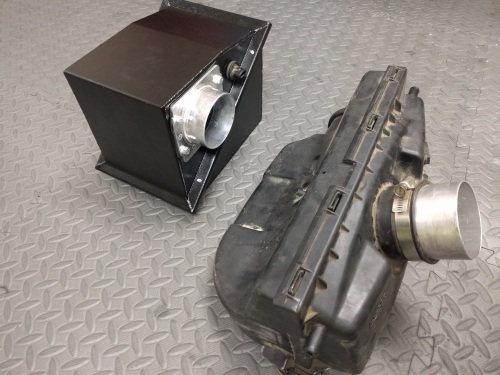
The original Subaru airbox (right) compared to the newly modified RMW airbox (left).
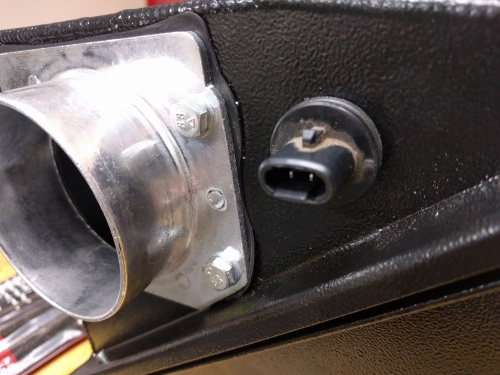
Moving on to the van, I prepped the area of where the airbox would draw its cold air by mounting the new intake hose (taking care to bend the end into a 90 degree angle behind the grill to minimize moisture intrusion) and pasting a few pieces of FatMat on the interior side of the body panels to knock down the decibels and vibrations even further. From there, it was a simple process of bolting the RMW airbox back on its bracket, tightening a hose clamp over the new 3″ intake hose on the new flange and the same on the outlet flange, and plugging in the intake air temperature sensor. Easy.
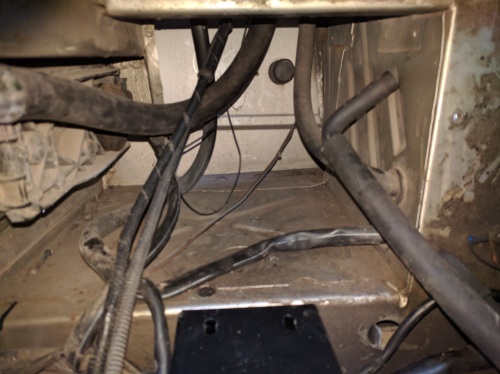
The cavity below the rear D pillar and cabinetry where the new airbox is mounted (new mounting bracket can be seen at the bottom center of the photo).
After another test drive, I noticed a much reduced level of noise from the new airbox. Instead of reverberating in the engine bay cavity as designed, the intake noise is transferred to the outside of the van from the fresh air intake grill in the D pillar. It’s quieter inside the van and is really only noticable when the driver’s window is down and my foot is in it.
The Verdict:
The RMW airbox is a quality piece of equipment that needs only a few basic modifications to work properly. It’s a high quality design that fits beautifully in the engine bay and will make future air filter changes easy. Recommended.
Filed under: Uncategorized | Leave a Comment
dash removal
“I wouldn’t hesitate to drive this van across the country. After someone reinstalls the dash.”
Dear God, what have I gotten myself into?
Ranger’s blower motor has always been suspect and I’ve been waiting for the day it finally gives up the ghost. Under the previous owner’s watch, a rodent invasion had taken place, gumming up the heater box and blower motor. And last fall, it finally quit on me.
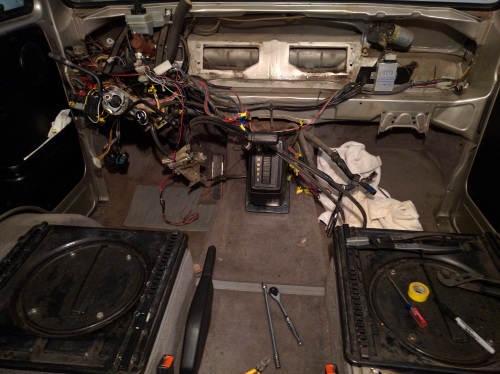
Over the winter months I began doing my research on going after this horrific job, watching YouTube videos, reading threads on the Samba, and talking to others who had gone down this road before. How bad can it be, right? So I rolled up my sleeves, and in my freezing unheated garage (during an unseasonably cold Northern Michigan spring), I dove in and started work.
Since I was already going to be there, I made a laundry list of other things to do on this project:
- Replace the heater blower motor
- Replace the heater core if necessary
- Replace the foam seals on the heater box flaps
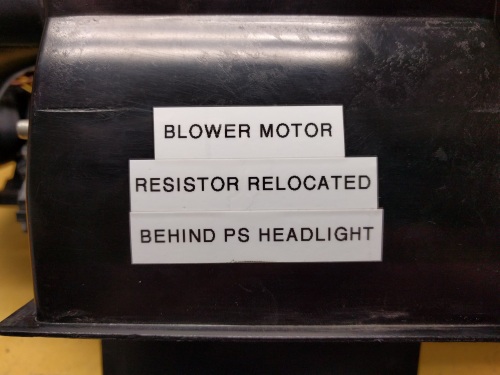
- Replace or relocate the blower motor resistor
- Eliminate the last traces of rodent activity in the heater box
- Insulate/soundproof the cabin area with FatMat
- Run some new 12v circuits from the auxiliary fuse block to the dashboard and Rhino console
- Lubricate the wiper arm joints
- Replace the ratty carpet and padding
- CLEAN EVERYTHING
These online resources were a great help on this project:
- uprightbassghost’s YouTube video is HILARIOUS (the first line of this post was borrowed from him)
- busaru’s YouTube video was very informative and had some great ideas
- Benplace’s website is an excellent step-by-step photo guide on how to do this
Pulling the dash is pretty straight-forward; remove the instrument cluster, remove the steering wheel, drop the steering column, disconnect all the switches (you have to cut the power supply wire to the blower motor–fun when you’re holding the dashboard in one hand and trying to find your dikes), knobs, HVAC controls, and ductwork, pull a few screws, and the whole thing comes right off. Easy, right?
Once the dash is free, pull the heater core hoses with a set of pinch-off pliers, remove four screws and two nuts to pull the heater box from the dash.
This simple activity took something like four hours of slow methodic work, labeling everything as I went. And I lost a lot of sleep the next few nights wondering how I’d ever get it all back together again.
Since my van is a 1991, it came with a number of “improvements” including plastic welding the halves of the heater box together and I knew through my research that separating them would be an iron-clad bitch. I found the best solution was to dress the end of a stiff putty knife with a file so that I had a good sharp edge; then, wrestling the heater box around on my work bench and cleaning up the last of the coolant dripping from the heater core, I not-so-gently tapped the sharp putty knife around each of the 17 plastic welds to separate the halves of the heater box.
Pulling the heater box apart proved to be an exercise in holding back my gag reflex.
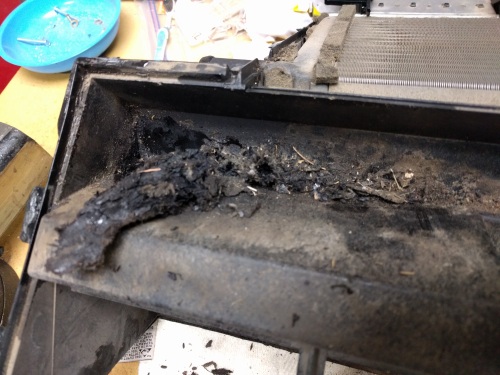
Honey, I found the smell!
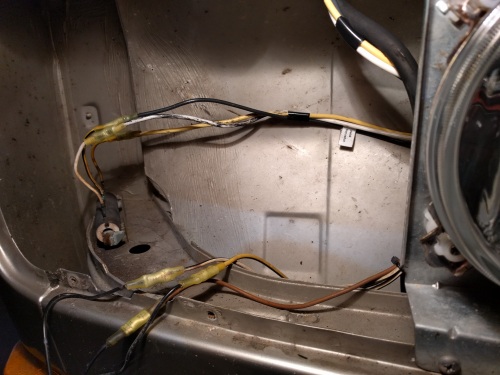
Original blower motor, wiring, and resistor, smack dab in the middle of the mouse family’s front hallway.
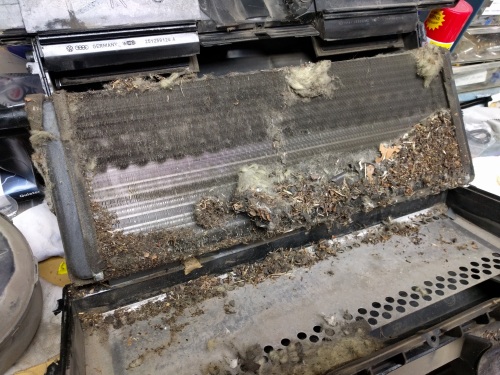
Amazingly enough, some air was still able to flow through this heater core.
Pulling everything apart, chiseling out the baked-on rodent shit, and thoroughly cleaning the entire heater box in a tub of hot soapy water took some time. Through it all, I found the heater core, despite being nearly plugged by rodent nest material, was in excellent shape after I cleaned it up. The blower motor and resistor: not so much.
I recall last spring flipping the heater valve slider to the open position and cranking the fan control to its highest meager speed, only to be greeted by a sharp burning smell emenating from the dash vents. Inspecting the heater box, I found the reason why.
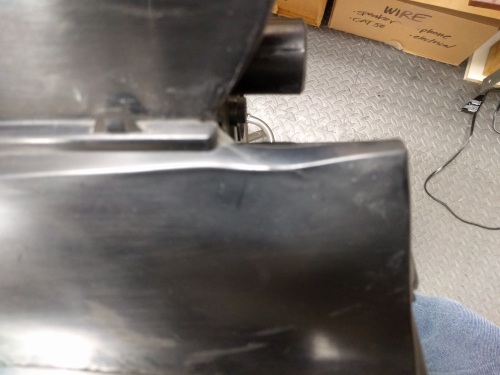
Why is the outside of my heater box deformed?
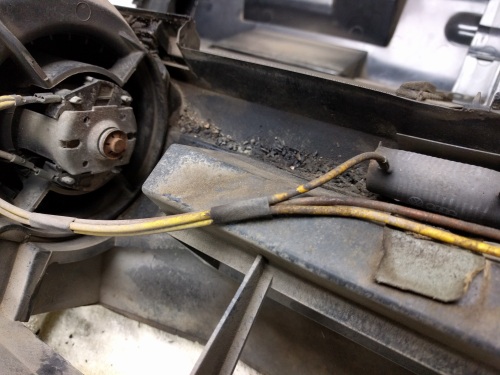
The stock resistor’s original location and the source of the burning smell, likely due to a big power draw trying to turn gummed-up bearings on the motor.
It was clear to me that the blower motor resistor would not be reinstalled in its stock location. Obviously, there’s a problem with a very hot ceramic resistor living in a plastic house, and replacing it when it fails is a giant bitch. A change was needed.
Through my research, I found a number of potential solutions to relocating the blower motor resistor. VW’s location seemed strange to me, but I guess it’s supposed to be in a location that has fresh air flow to aid in cooling (how’d that work out for me?). Solutions I found included screwing it to the outside of the heater box, cutting a hole in the heater box and replacing the stock resistor with a MOPAR part, or extending the blower motor wiring harness and relocating the resistor behind the front grill (just like the radiator fan resistor that lives behind the driver’s side headlight). This one made the most sense to me, so I did some measuring and started in on a new wiring harness while waiting for a new motor to arrive.
New wiring harness.
Having sorted out the blower motor replacement and resistor relocation, I moved on to some much needed love for the heater box flap seals. After 25 years, mine were in pretty sad shape.
I believe that at one time this was some type of foam product on the heater box flaps.
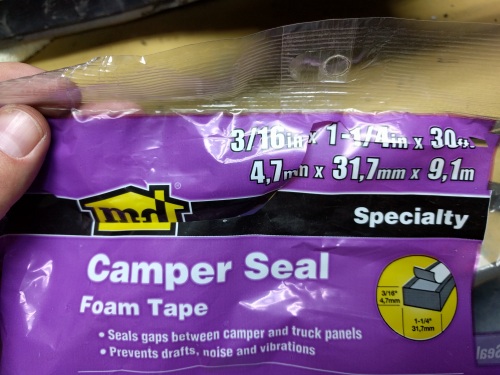
This stuff should work. $7.49 at Home Depot.
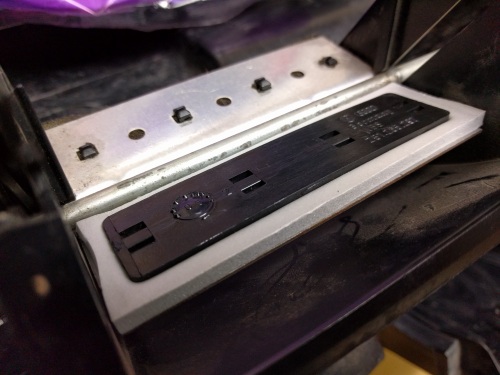
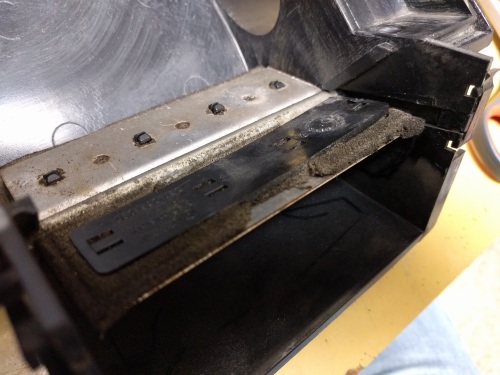
Heater box flaps cleaned up and equipped with new foam seals.
When the new blower motor arrived from GoWesty, I hastily wired it up and bench tested it with my new wiring harness and the old resistor. Having positive results cycling through all three speeds, I decided to not replace the resistor (because it will now be easy to replace when it does fail–heh heh) and started taking steps to permanently install the new motor and reassemble the heater box.
A note on replacing the blower motor resistor; this part can be difficult to source, and when you can, it’s not cheap at $75 or so. A Samba forum member, big swifty who inspired my resistor relocation project, also provided me a link to a $20 replacement ceramic resistor (the VW switch is 3-position so you’ll just leave one of the leads from this 4-position resistor disconnected).
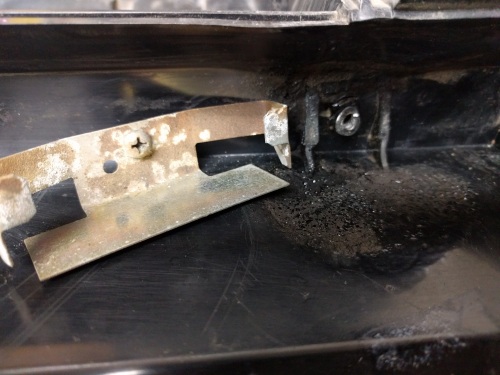
Through my research I found a few solutions to reassembling the heater box. In deference to a future owner, I didn’t want to glue the two halves back together, but replacement clips used on earlier model vans are expensive and I’m not a fan. I saw that one owner drilled small holes through each of the welded tabs and secured small zip ties through them. Taking that idea to another level, I decided to substitute the zip ties with a few sheet metal screws I had lying around (thanks again, Dad, for teaching me to never throw away those extra screws).

Sheet metal screws driven through pilot holes I drilled in the perimeter plastic welds–17 total.
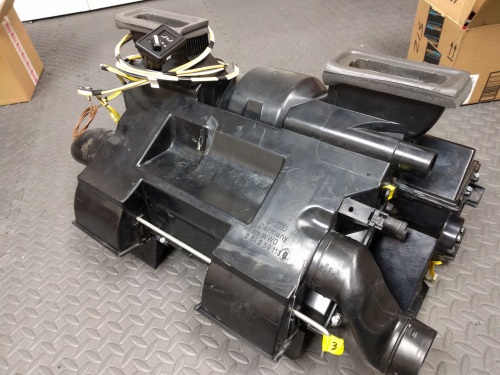
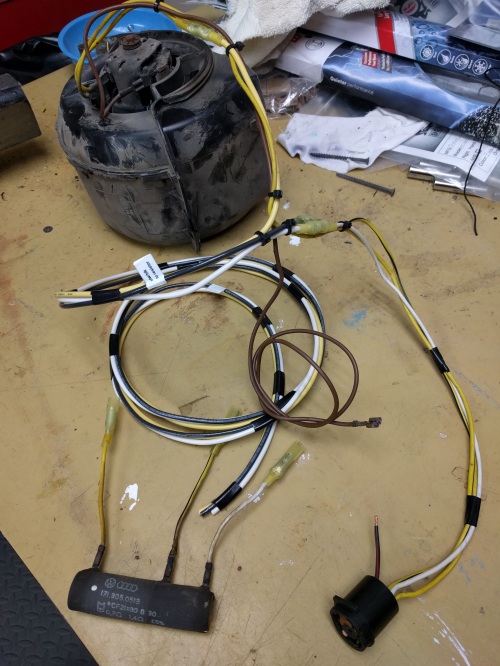
Refurbished heater box and extended wiring harness ready to be reinstalled.
Some day, somebody is going to thank me for this!
The blower motor resistor’s new home behind the passenger side headlight.
While I was waiting for the blower motor to arrive from my friends at GoWesty, I decided to tackle another project: thoroughly clean up the dashboard area and insulate the cabin floors and walls for heat resistance and soundproofing (you can read about my previous FatMat installations, including links to product details, here and here).
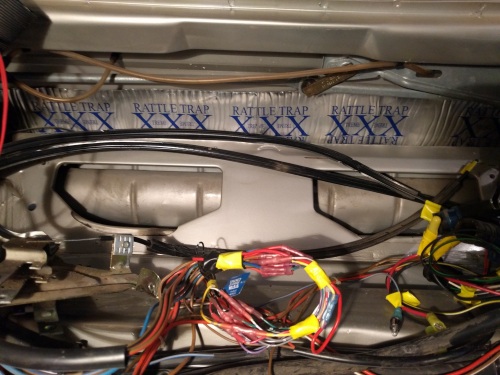
Cleaning up the floor area of the driver’s side foot well was another PITA. Apparently, by 1991, VW recognized they had a problem with excessive heat in this area caused by conduction of hot coolant hoses and radiator heat dumped through the tunnel (Vanagon Hot Foot Syndrome–you can read about my previous attempts at addressing this with Ranger here.). Their solution? Glue some kind of rubberized mat to the driver’s floor and use that same sticky stuff to secure a reflective heat shield to the tunnel wall. Both were chiseled off with my sharpened putty knife.
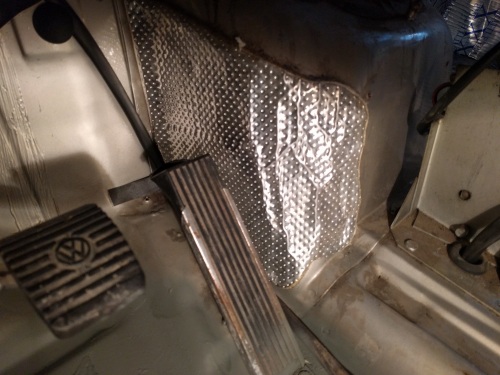
VW’s 1991 answer to Vanagon Hot Foot Syndrome.
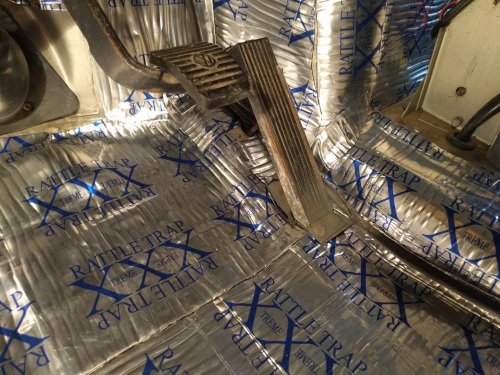
Bentley’s 2016 solution.
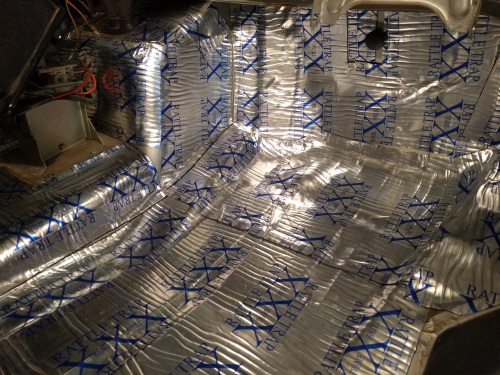
FatMat treatment in the passenger side foot well.
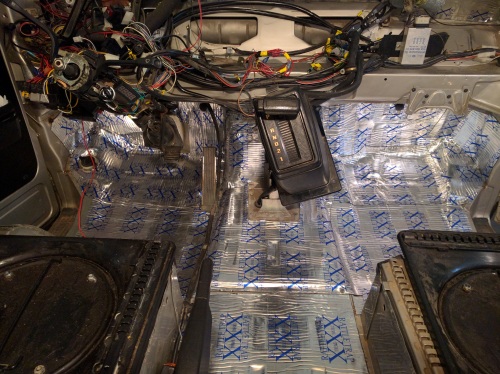
FatMat covering the entire front floor from the passageway between the seat pedestals to the foot wells.
Extra FatMat insulating/sound deadening the nose sheet metal in front of the cleaned-up heater box location.
After inspecting the windshield washer lines and lubing the joints in the wiper arms, it was time to begin the reinstallation process, simply the reverse of the removal process. And it wasn’t as bad as I expected. Did it come with any hiccups? Of course–it’s a Vanagon! But that comes with the territory.
Finally, some warm weather arrived and it was time to move on to the next phase of the project: replace the filthy and thread-bare OEM carpeting.
I decided to go directly to Sewfine Interior Products for their 9 piece Vanagon Carpet Kit and replacement padding. It’s the same kit sold by GoWesty but you can save yourself a few bucks from the GoWesty markup and exhorbitant shipping premium by buying direct. My order happened to be on the shelf and was shipped out the same day via UPS. It should be noted that the Smoke color is Sewfine’s version of Westfalia gray and is a very close match. Sewfine’s website also includes a nice step-by-step photo gallery for installing the kit in a Vanagon that I found quite helpful.
Something else to be aware of: this replacement kit is not the same type of sculpted OEM carpeting that came stock. As such, the installation is a glue-down and Sewfine recommends using Sprayway Fast Tack 92 for this purpose. Unable to find it locally, I picked up three cans from Amazon for $18 each (two full cans were used and the third was used only for the final carpet piece–YMMV). Fast Tack 92 is also available from Sewfine for about the same price, so you can order it along with your carpet and pad.
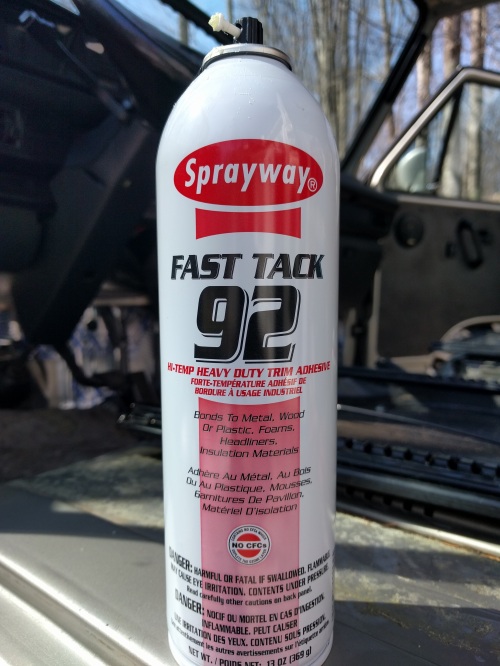
“Glue. Strong stuff.”
Installation of the carpet kit is pretty straight-forward; test-fit each piece, coat the mating surfaces with spray adhesive, and smoothly press each piece into place, working from one end to the other. The adhesive is immediately tacky and will hold the carpet piece in place, but you can still make final adjustments before the one hour cure time.
While Sewfine suggests a “perfect fit every time” I would actually classify their kit as “a pretty good fit most of the time”. I did have to do some minimal trimming and had to reinstall a piece or two to lap against another piece properly, but it all worked out well. Sewfine also chalk marks the back side of the individual pieces for cut-outs around the emergency brake, transmission shifter, throttle pedal, and carpet button bolts which proved to be pretty accurate. Recommended.
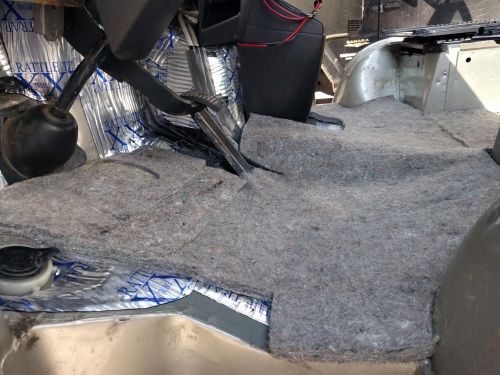
The replacement carpet padding is THICK.

The finished install of the driver side foot well. Don’t forget to leave the left end of the center piece free for access to the windshield washer reservoir!
The passenger side foot well turned out quite nicely but required a fair amount of fiddling (because I got cocky and didn’t follow the online installation guide…).
The seams around the wheel wells are a bit bunchy; I’m hoping they flatten out over time.
The seat pedestals are the toughest due to the changing angles and extra wiring I have running toward the front of the van. They are also where you start the process and you haven’t yet learned all the necessary tips and tricks.
The finished product; I am pleased.
I couldn’t wait to take Ranger for a spin and was not disappointed; heat and ventilation on demand, a much quieter ride with wheel well road noise greatly reduced, and a new carpet smell made the maiden drive of 2016 a satisfying experience.
All in all, these were all fairly straight-forward projects that you shouldn’t hesitate to try yourself if you possess some basic mechanical and wiring skills, a bit (OK a LOT) of patience, and aren’t afraid of skinning up your knuckles on all those sharp little dashboard bits. Take your time to be methodical and take care of some other necessary stuff while you’re there and you’ll be able to step back with some pride in your accomplishments. I did!
Filed under: Bentley, Preparations | 1 Comment
day 1: broken but not down
I had a big grin on my face as we clipped along I75 and I69 at a healthy 68 mph toward the border crossing at Port Huron. Ranger was running great despite the hot weather and I was actually enjoying kicking back and letting other cars pass me on the freeway–after all, I was still passing trucks.
The long line on the Blue Water Bridge loomed ahead as we settled in, waiting our turn for the border crossing. A burning smell came through the open windows but I thought it was just the refineries on the hazy horizon. Until I looked down at the temperature gauge and saw it higher than it should be with the red “Oh Shit!” LED flashing furiously. And true to form, I was in the wrong line.
No fan noise. Water spewing out from beneath the van behind me. My worst Vanagon nightmare.
We finally made it through, too scared to shut the engine off and hoping to God that the Subaru 2.5 wasn’t melting down, and pulled off to the side of the 402 to cool down. Once again, my van was a picture of disarray with our luggage strewn along the shoulder of the road, engine bay open, and me, doubled over the back end of my van trying to figure out what was wrong.
Turned out the coolant bottle level sender was cracked off at the threads, allowing air to enter the cooling system and effectively depressurizing it. Not a good problem to have on a 90F day in a foreign country.

After looking things over under a shade tree at a local park and consulting with my Ace Vanagon Mechanic, I discovered my radiator fan was not functioning (the same one that ran too much on last year’s trip, cutting out the AC) and I needed to resealn the cooling system by plugging that level sensor hole.
A trip to an auto parts store 3km away got me a kinda’ fix and while trying to affect it in the parking lot, I was approached by a curious local who attempted to help me jury rig an oil pan expansion plug to no avail.
“I live right around the corner, come on over and we’ll fix it.”
A trip to his nearby welding shop, a 1″ pipe nipple with a cap welded on, and a few beers later, we were back in his driveway putting the whole works back into operation.

An hour, a jack, and a few beers later, and we had the system bled and Ranger was once again maintaining normal temperature, providing we kept air flowing over the radiator.
After thanking him profusely, Paul would not accept an offer to buy him and his wife dinner, only asking that we pay it forward some day, because “it’s sucks being broke down, eh?”
I considered driving another three hours to Niagara Falls and continuing the trip; cooler temps were forecast, and we wouldn’t be in much traffic, but it would just eat away at me knowing things aren’t perfect and I wouldn’t enjoy our vacation even if things went well. So we decided instead to camp at a nearby campground on the 402 and cross back into Michigan the following morning to get closer to home.
So the Great NE Westy Trip is on hold for another time. We’ll instead get back to Michigan and take a couple of days of slow touring on coastal two lanes and camping along the way, not asking too much of the freedom vessel. And I’ll be comforted knowing that the world still has space for good people to help when needed and not asked.
In the end, not a bad day.
Filed under: Uncategorized | Leave a Comment
Great NE Westy Trip 2015
I think I enjoy planning a trip almost as much as being on one; researching places of interest, mapping the route, making a reservation here or there, and the anticipation of what those blue, black, and green lines on the map will look like in real life from the windshield of a VW Westfalia camper van, AKA, the freedom vessel.
In just one week we embark on the Great NE Westy Trip 2015, a 2,600 mile two week journey through Niagara Falls, Adirondack Park, Lake Champlain, the White Mountains National Forest, the Maine Coast, Acadia National Park, Baxter State Park, Montreal, Ottawa, Algonquin Provincial Park, and back home via Sault Ste. Marie. Some of these stops will be short by necessity, while at others we will linger to take in the scenery, but through them all, Ranger will take us in style.

Won’t you follow along?
Filed under: Bentley, Preparations | Leave a Comment
electrical stuff
Imagine my disappointment in that expensive auxiliary battery from GoWesty lasting only two years. I felt like I paid too much for it (before shipping) and I really didn’t want to get into that rat’s nest of wiring going to the two terminals under the driver’s seat. I knew I needed a new battery and should probably put in an auxiliary fuse block to clean up the wiring and a switch to shut the whole secondary system off for winter storage.
Fortunately, I was able to find the same battery from GoWesty at Interstate Battery’s website, and speaking with my local Interstate Battery dealer, got an Interstate 1161 on order for much less than buying and shipping through GoWesty ($149 + $50 shipping from GW, $115 + tax from my local Interstate Battery dealer). Upon inspection at the local dealer, the batteries are exactly the same. Hope this one lasts longer, though.
Thanks to my fellow Westy owner Abel (who runs Texas Vanagons, check ’em out) I was set up with a list of recommended materials and methodology for installing my auxiliary battery control system:
- Blue Sea Systems Fuse Block
- Blue Sea Systems Switch
- 12 ga. marine grade wiring, fittings, and accessories (from Greg’s Marine Wire Supply)
Before I stepped away from this little project, I decided to finish a sub-project suggested by Abel that he did with his van, Libby. As my wife and I sleep in the lower bunk with our heads toward the rear hatch, charging our phones and having them close by in the middle of the night is always desirable (especially when that alarm goes off at 6:30 AM on Saturday morning because you forgot to turn it off…). So taking Abel’s advice, I pulled a duplex wire from behind the driver’s seat, through the cabinetry, and into the upper shelf behind the AC unit where I installed a dual USB power outlet. Slick!

New dual USB charging port in the upper cabinet behind the AC unit.

The newly-organized auxiliary battery system’s fuse block. These wires will be better organized and cable-tied together after a few more circuits are completed.
While I have yet to install my switch (still looking for a good spot), most of my circuits have been consolidated into a common location behind my driver’s seat where changing a blown fuse will be easy. And once I’m finished with a few other circuits, I’ll post my labeled circuit map next to the board for easy reference.
Up next: camping!
Filed under: Bentley, Preparations | 2 Comments
solar shower
One of the great things about being an owner of a Westy is the awesome community of fellow tinkerers who share their great ideas for modifying these old vans to make them better and better. Today I put the final touches on one of my favorite mods, a roof rack-mounted pressurized solar shower.
We’ve been using a bag version of a solar shower in our shower tent for the last few years, and while it works, it’s a bit of a PITA (hanging very low in the shower tent) and it works just OK with a gravity feed. I’ve considered the nicely engineered (and well-marketed) Road Shower but just couldn’t justify the cost. Could there be a way to make my own?
Sure enough, I stumbled across a blog post from fellow Westy owners Where’s My Office Now laying out detailed instructions on how to build your very own roof rack-mounted solar shower using only materials available from your local Home Depot. Perfect!
Of course, my local Home Depot didn’t have all the 4″ PVC fittings I needed. And my local hardware store didn’t carry the Schrader valve I was looking for. So I ordered these items from the default Amazon.com, assembled materials, and eventually got to work.
Well, my first iteration didn’t work so well, leaking like a sieve. The problem was I used a cheap boiler blow-down valve with plastic nuts on either end of the threads and drilled my hole too large. After cutting off the end cap and starting over on the working end of the system, the better quality valve and a few changes in construction (see below) now make for an air-tight fit.
I won’t go through the full details of the installation as Where’s My Office Now did a really nice job of doing that. I will, however, offer a few suggestions/improvements on their design:
- You can use the domed end cap for the front of your shower tube but try to find one with a flat surface for the rear cap–this will make it much easier to drill and mount your fittings.
- Spend a few extra bucks on a ball valve spigot (or boiler blow-down valve as it’s commonly known) for a better air tight seal.
- Use a 3/8″ spade bit to drill the Schrader valve hole in the end cap; this will be slightly smaller than the threads on the valve which you can cut with the valve itself (no tapping kit needed). Take care to drill the hole as straight as possible for this operation (this is where the flat end cap is helpful).
- Use a 1″ spade bit to drill the 1″ blow-down valve hole in the end cap; this will be slightly smaller than the threads on the valve which you can cut with the valve itself.
- Use rubber gaskets on either end of the end cap walls and slicone the crap out of the threads on the Schrader and blow-down valves.
- Avoid using plastic sink nuts to secure your blow-down valve to the end cap. I found thin metal washers for electrical conduit worked great for this operation; by backing these washers down the threads from either side of the end cap wall, my valve is very tight and will not turn inside the end cap.
- Watch the paint! The rubberized leak seal stuff I used threw a LOT of paint in different directions. Mask off at least double of what you would otherwise use for normal spray paint and be careful!
- Use a LOT of Vaseline on the clean-out threads to make this part of the system air tight. I’m carrying an old pipe wrench under my bench seat to tighten and loosen this fitting as needed.
- A small bicycle hand pump is all you need to pressurize the system with a few strokes. Find one that’s high volume if you can, or you can use an air chuck and CO2 cartridges if you are lazy.
- I found the 24″heavy duty outdoor-rated cable ties were an excellent choice for mounting my system to Ranger’s roof rack.
- Changes in atmospheric pressure (elevation changes in the mountains, when storms come through, etc.) will affect your system, so be careful not to over-pressurize it and blow out the seals. If empty, leave your blow-down valve open; if it’s full of water and that you’re trying to heat up while underway, crack the clean-out at the top of the system to regulate pressure.
After finishing the system and touching up the paint, I charged the system with about 15 strokes of my old mountain bike pump and left the gauge on it; fifteen minutes later, it was still holding pressure at 15 psi, and cracking the blow-down valve open released a rush of air. Coming back an hour or so later, I realized I had shut the blow-down valve off, and with the sun now shining on the roof of my van, decided I had better open it back up to avoid over-pressurizing the system: a satisfying “whoosh” of pressurized air rushed out of the valve, satisfying my construction efforts.
As all Westy owners will know, efficiency of space is paramount, and using a single item for multiple purposes is great. I’m using our water tank filling hose for the shower hose, the shower head and pipe wrench take up very little space under the bench seat with the hose, and we can carry an extra five gallons of drinking water on our roof rack if necessary.

The working end of the finished system; Schrader valve at top for charging the system with air, boiler blow-down valve at bottom for attaching shower hose.

Front of the system with an aerodynamic domed end cap and low-profile cleanout for filling.

The complete system attached to Ranger’s roof rack using heavy duty outdoor-rated cable ties.

High volume bicycle pump and shower hose with nozzle ready for a shower!

The paint I used–it took two cans.
In the end, this was a fun and easy project and I can’t wait for my wife to use it the first time and be blown away by my ingenuity.
Up next: electrical mods
Filed under: Uncategorized | 6 Comments
shurflo faucet upgrade
Since pulling the trigger on those expensive but oh-so-cool GoWesty Plate Steel Bumpers, I’ve had a good balance of GoBucks burning a hole in my GoWesty account. And since I needed a very inexpensive relay, I decided to knock off another little upgrade I’ve been considering for a while now.
As with the hookup boxes I upgraded the first year I owned Ranger, the Delta Six equipment in the galley has been a target for replacement. That Delta Six faucet has been a real PITA–it releases but a trickle of water, the rotary valve handle is impossible to manipulate when your hands are wet (and when they’re soapy, ask for help), and…it’s brown.
Enter the Shurflo Faucet Upgrade Kit from GoWesty. It has better flow, you can point it in the direction you want it to go in the sink, and it comes in gray. I was hooked.
The installation is very straightforward; remove the Delta Six faucet by pulling three screws from the top of the assembly, pull the wires free from their spade connectors, unscrew the city water connection, and pull (cut) the fresh water supply hose from the bottom of the faucet. Easy.
Installation of the Shurflo is just as easy; mount the adapter plate in the same screw holes, and connect the spade connectors to the power supply. One difference is the Shurflo kit includes a check valve assembly that the fresh and city water supplies connect to and feed into a common supply line to the faucet assembly. Still easy.
It became apparent to me during the installation that something had to be done with the nasty discolored water supply hoses. And since I had some plastic tubing around the house from a replacement condensate lift pump, I decided to dive in an do this job right.

These water lines were once clear…
On the surface, this job is easy with just a few challenges. I taped new hose to the old hose and pulled the old hose through the cabinetry. A word of caution: with the fresh water supply line, mine was secured deep behind the cabinetry with plastic clips. Fortunately, I was able to pull these free without breaking my taped joint between the old and new hoses with some coaxing through the accessible spots in the cabinetry (I did NOT want to remove my fridge again!). I repeated this process with the line attached to the submersible pump inside the fresh water tank as well as the overflow line leading back out to the hookup box. Again, pretty easy, but there were a few swear words here and there.

The old Delta Six faucet. Goodbye!
Once finished, I poured a few gallons of water into the tank, flipped the switch on the Shurflo, and saw a beautiful stream of aerated water pouring into my sink. And with an easily gripped control valve, it can be turned on and off with wet soapy hands. Beautiful.

The beautiful new gray Shurflo faucet.
Up next: slider door maintenance (or maybe the pressurized shower…)
Filed under: Uncategorized | Leave a Comment
new interior panels
Two years ago on our first Great Western Westy Trip I caught myself drooling over the black ABS panels cladding the interior of a super-sweet SVX-powered tin top in the Snake River KOA. Since then I’ve thought how these simple and durable panels would look in my van and added them to the wish list.
After much research, I decided to buy from Werksberg Products as advertised in the Samba classifieds. Similar panels were also available through GoWesty and others but I chose Werksberg for the following reasons:
- Panels are made to order with the appropriate holes pre-cut (others have the openings scored and you must cut them yourself).
- Product cost is less than others.
- Shipping charges are more reasonable than others.
- Numerous satisfied users promote Werksberg on the Samba.
- Panels are made in American by some retired guy in California.
For $440 I got a complete set of panels for my full camper and waited for them to arrive.
I got to work on the passenger side door first, pulling off the wavey, stained, and ripped door card and casting it aside.

My tired, old, ripped vinyl & cloth door cards.
I also took the opportunity to do add some sound deadening material to the inside of the oil can body panels to hopefully reduce the road noise that Vanagons are well known for. Since I had a good supply of Fat Mat left over from last year’s sound deadening project (it was supposed to be used for the front cabin area which I haven’t gotten to yet) I started off cutting and piecing it into the cavities behind the new panels.

Installing Fat Mat inside the rear hatch cavity.
I debated on whether or not to reinstall the yellow fiberglass insulation that was originally packed in these cavities and chose to do so when buttoning them up.
Stepping back and looking at the final product was quite satisfying. The interior of my van is now a simple beautiful black offset with the original gray upholstery on the seats and an industrial-looking set of screw fasteners decorating the perimeter of the new panels. She looks like a new van.

Before

After

New rear hatch panel.
As with most things one does with these old vans, fixing one problem typically uncovers another, and this project was no exception. After putting the passenger side door back together, the power window switch failed to regulate the window. I’m afraid there may be a broken wire in the door hinge area (a typical problem with these vans, as electronics in the doors were not part of the original design and were added on in later models, and my pulling and fiddling with the wires likely separated a weakened section). Not having the time or patience to chase electrical gremlins in 40F temps, I decided to button up the door panel and save that project for another day (or my mechanic).
Finally, it was time to deploy the replacement bumper sticker to Ranger’s new bumpers:

The proof was in the pudding when I took Ranger for a test drive this evening. What a difference the Fat Mat has made to the road noise. And the doors close with a solid “thunk” instead of that old Westy oil can rattle. I highly recommend this effort to anyone willing to spend the time required.
Up next: slider door maintenance
Filed under: Uncategorized | Leave a Comment
new bumpers

137 pounds. At GoWesty shipping rates, that really hurt. But there’s nowhere else on the planet where one can buy a set of GoWesty Plate Steel Bumpers. And now my van has them.
Pouring over photos of bad-ass Westies I’ve drooled over the simple, robust, and stylish design of these bumpers to replace the flimsy, cracked, and faded (well, I did paint them) fiberglass bumpers on my van. And I’ve always wanted to mount a full-sized spare tire to the back of may van on a way-cool swing-away.
Armed with my tracking number I waited. And waited. And waited.
On the day UPS had the package Out for Delivery, I started doing some prep work on my van. Old bumpers and body cladding panels had to be removed and bits ground off to make way for the new set.


Those tabs on the top of the frame rail need to be cut off to accommodate the new bumpers. There are also fittings below that are supposed to be cut off or hammered in but I skipped that step.
When the big brown truck pulled into my driveway I greeted the driver (we’re buds now) and helped him schlep the giant box out of the back of his truck and into my garage.
Unpacking a GoWesty order is as much fun as unpacking a new Mac–you just know it’s cool stuff.
A few hours of wrenching, reading instructions, wrenching some more, re-reading instructions, and re-wrenching, I was able to stand back and admire my van. It’s as I always pictured it: bad-ass.


Up next: slider door maintenance.
Filed under: Bentley | Leave a Comment
